Tuesday, October 1, 2013

Preparing for a Big Cook


I will be starting a work contract next week so it is time to fill the freezer. 
Step 1 was to defrost the freezer. I have not done this for 5 months so in order to fit my proposed 30 suppers into the freezer I needed to get rid of the frost build up.  

Step 2 is choosing the menu.  I am going to go out on a limb this time around and try a few new recipes.  The new recipes have come from my free time habit of Pinterest and then my family's favourites.  

Chicken Noodle Soup - family favourite


Crockpot Beef Roast -family favourite
Chicken and Sweet Potato Stew


Lasagna -family favourite


Salmon in Marinade
Sweet and Sour Spare Ribs

Step 3 was preparing my grocery list. In chicken scratch, I recorded all the ingredients I needed and compiled the shopping list you see below.  I could get all fancy and develop a spreadsheet of recipes and servings but I'm not the engineer in the family and am looking to make the job as fast as possible.  Saving time is the goal of batch cooking.  


I love using this grocery list. It is a pad that I found at chapters a few years ago. One will last almost a year if you get groceries once a week.  A strong magnet on the back lets it stick to the front of my pantry freezer and then I add as I discover what I need. When it is time to head to the store I have a list already to go without too much thought.  

That could really be another whole post!  I have headed to the store without a list before. I stood in my pantry prior to leaving and took pictures with my phone. It worked for wondering if I had the item or not once I was at the store. 


Here I am at the grocery store ready to shop!  My preference is to use the Real Canadian Superstore and Costco.  On this particular Big Cook I was able to purchase everything I needed at the Superstore.  

Why do I choose them?  I bring my own bags, they package meat in large serving sizes, their prices are significantly cheaper than Safeway and Sobey's, and with a $250 purchase I receive a $25. Gift card for the next time I shop.  That is another 10% off the already best price in town. I also enjoy the fact that I can pack my own bins or bags.  This way I organize it at the store for what needs to be put away immediately when I get home.  If I could, I would really prefer to scan my own groceries at the self scan but again that is probably a bit of my controlling issues showing through.

Step 4 is going to be getting those groceries into the kitchen.  Join me again when I have a minute to post  "Inside the Grocery Store" and then "The Cooking Part of a Big Cook". 

Have a Sunny Day, 

Danine


Wednesday, February 20, 2013

Achieving a Clean Finished Look


When I am sewing I love to have clean lines and a fully finished look.  In order to get my clean finished look on this crocheted and embroidered apron bib I used a small zigzag along the crocheted edge.  

Here are the steps I used to achieve the final look.


I cut out both the fashion fabric (the embroidered pillowcase) and the lining (plain white).  The darts were marked and stitched and then the 2 layers were placed right sides together.  I stitched the underarm seams using the edge of the presser foot as my seam allowance, approximately 1/4".


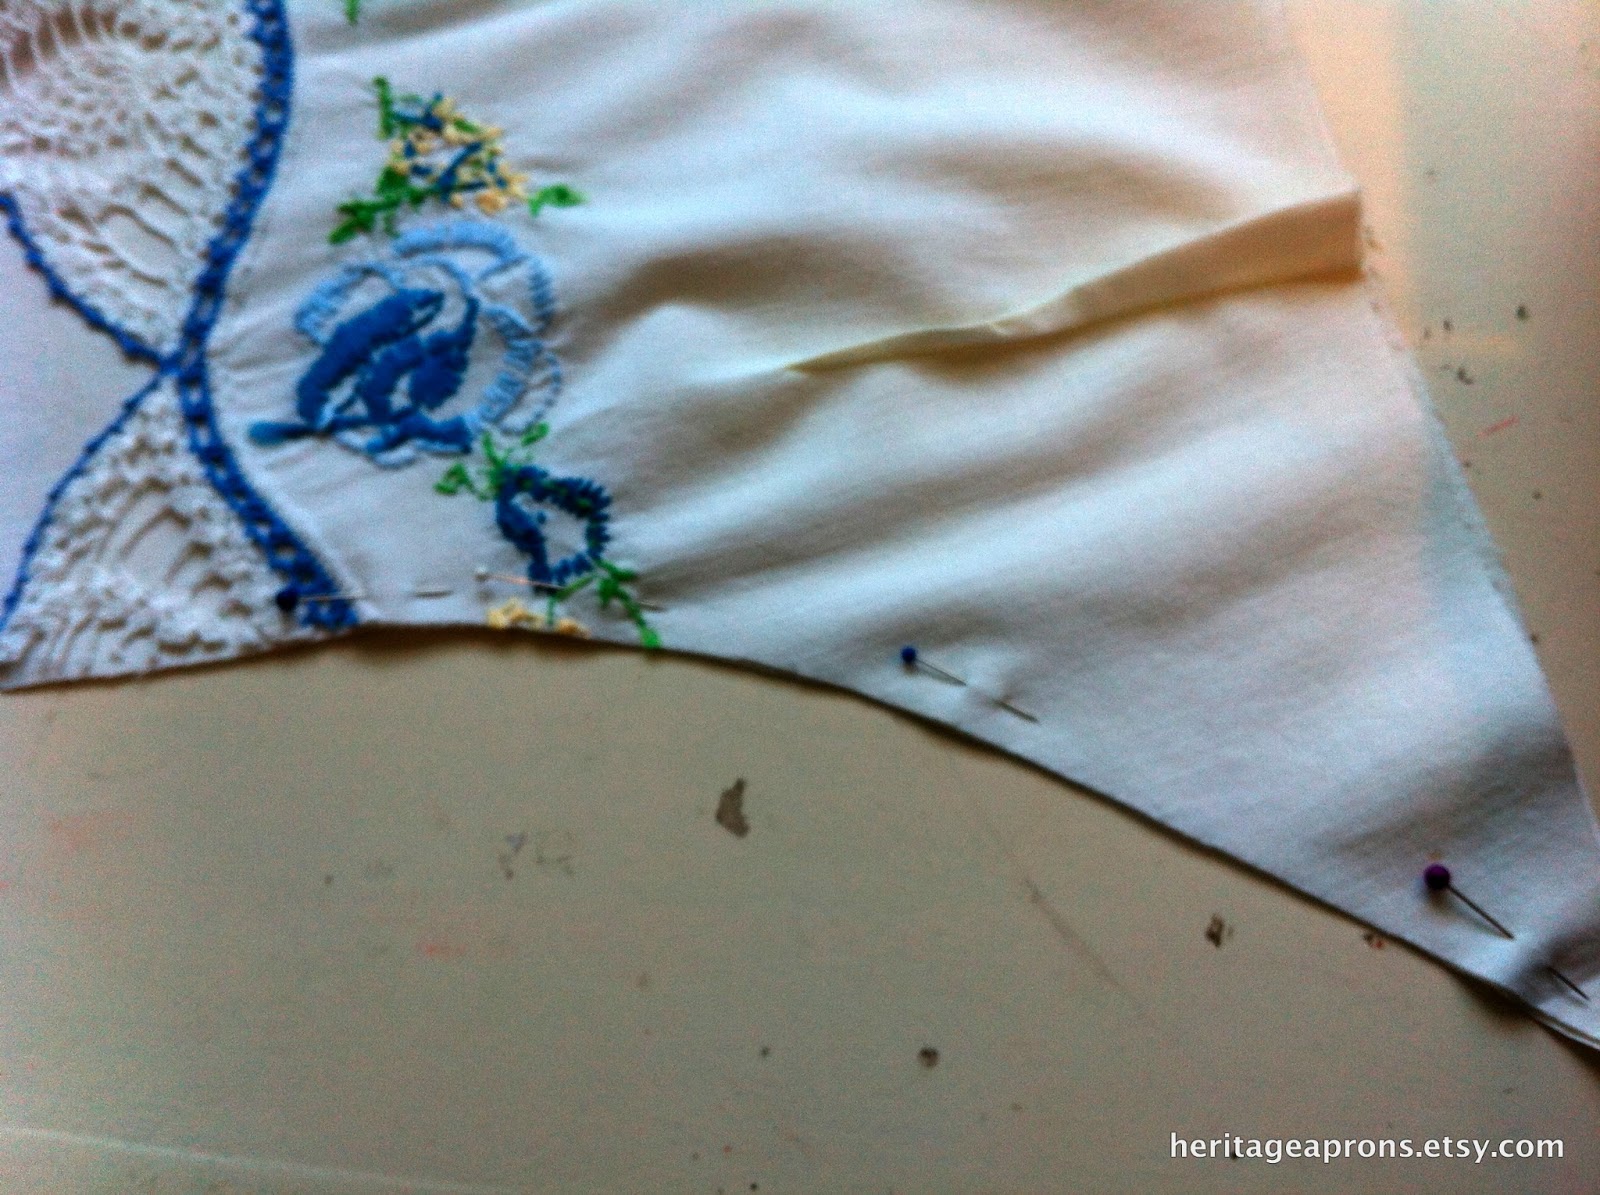
Next I turned the bib right side out and pressed the underarm seams.  I pinned the bib flat and used a short narrow zigzag to finish the top edge.  This is where the special edge finish starts to happen.  


Pictured here is the exact stitch length and width I used for the zigzag edge finish.


Once the full width of the bib top had been zigzagged I flipped the bib over to view the lining side.  The new stitching line followed the original stitching line of where the crocheted cotton had been attached to the pillowcase.  This is what the backside looked like.


 Now it is time to use my favorite pair of scissors.  They are a gingher bunt tip pocket scissor.  Excellent for using on the embroidered or crocheted linens I work with.  They will not catch or accidentally cut your embroidery!   I made my scissor purchase through Debra with Labours of Love Heirloom Sewing.  They are an online business that operates near Vancouver, BC,  Canada.  An worthy investment for the   the type of sewing I enjoy.  


These incredible scissors let you get in tight against your zigzag and not catch the crochet cotton.  I trimmed along the full front of the bib.


Once the selvage lining had been cut away you have a cleanly finished edge.  The lining side looks clean and crisp.  Your Front side looks clean and crisp. 


It is as easy and simple as that!  


Stay tuned for a post coming in the near future revealing the full Apron pictured here.  It was a custom ordered piece delivered to Saskatchewan, Canada.  


Thank you for sharing in my passions, 

Danine


Monday, January 28, 2013

Exhibit and Celebration of Heritage Aprons published in Apron.ology 2013


I am very excited to announce that I have been published!  Apron.ology has chosen 4 of my uniquely designed Heritage Aprons to be published in their 2013 volume.  You are invited to help celebrate.  

An exhibit of 20 Heritage Aprons designed by Danine Regenwetter of Avonlea’s Heritage Aprons will be held at the 

Lee Pavilion in the Citadel Theatre 
on Friday, February 8, 2013.  
 6:00-8:00 p.m.  
Edmonton, Alberta  Canada

I will be on hand to celebrate this most recent publication, lead a show and share of the Aprons on exhibit, and sign copies of the magazine.  The exhibit will include the 4 published Heritage Aprons.  The American magazine titled Apron.ology is published annually by the parent company Stampington & Company.  The release date is this Friday, February 1, 2013.  

The publications are giving strength and confidence to this unique form of art.  It also secures that the dream I am following, preserving memories and heritage with vintage linens, is being loved by the public.  Designing new with preserving old.  Vintage tablecloths, doilies, handkerchiefs, and even pillowcases are repurposed and redesigned into functional forms of art.  These Aprons are preserving the memories of one’s heritage.  Aprons can be purchased from display or custom designed with your linens to preserve your family’s heritage. 

Please plan to join the celebration.  Wine and cupcakes will be served.  Click here to RSVP your attendance and number of guests.  

Thank you for visiting, 

Danine


Wednesday, November 21, 2012

Building Tips for your "Fort in a Bag"


Building a Fort is pure fun and a great way to encourage imagination.  This post is written especially for Adults needing to kick start their imagination and keep pace with those kids.  I have compiled a list of tips that will help you create a unique Fort every time.  My most important tip, remember to get down to the child’s eye level and experience the Fort from the inside.  This is where the memories will be made.  It will be an amazing encouragement to your child in preserving a Heritage.  A Heritage that will be remembered and passed from them to the next generation.  


Your Fort in a Bag comes with the basic tools you need to get started.  Additional furniture is an option but not required.  By using the Clothesline included you can get height for your Fort.  Tie the two ends to a piece of furniture, chair, curtain rod, or my favorite, a door hinge.  Of course you are the judge of where the kids can or cannot attach their Fort and what is a safe location. Score 1 for the Fort in a Bag!  Furniture usage is optional.   


Other items for your infrastructure could include couches, chairs, table (card), bunk beds, or Rubbermaid totes.
Choose a building spot that is not in a high traffic location.  I guarantee you will be much more open to having the Fort up for a few days, or weeks, if it is not in the middle of the Kitchen.


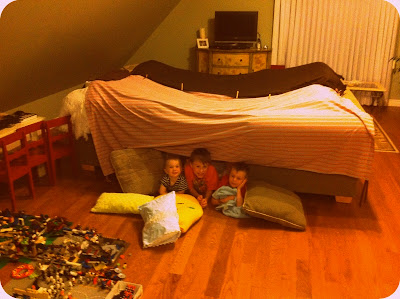
Add your included bed sheets to the Clothesline.  There are ribbons sewn to all 4 corners of your sheet.  It cannot slip away on you!  The simple straight and easy tent uses 1 of your sheets draped over the Clothesline and anchored to low lying furniture at all 4 corners using your ties. 


To increase the size of your Fort to a Fortress use one sheet per side.  Attach the sheet to your Clothesline with your included clothespins.  Remember to use your corner ties on the Clothesline for more strength and longevity.  Score 2 for the Fort in a Bag!  The sheets will not be continuously slipping away on you. 


Remember back to your days of building.  Books are great anchors and elastic bands will work to cover chairs with your sheets if you have run out of clothespins.  


Extra walls could probably be found in your Linen Closet.  However, chances are better that the Fort to last longer if you stay out of the Closet.  The sheets provided in this kit are especially for Fort building.  You will not be looking for these ones or having to rationalize with a 2 year old about dismantling his Fortress.  Score 3 and 4 for the Fort in a Bag! Your Linens stay in your Closet and there are no 2 year old meltdowns.

Consider creating an entrance and an exit for your Fort.  Once you get the little people and the Adult(s) in you may feel claustrophobic and be looking for a quick escape!  

Be sure to add a pillow and favorite Stuffies to the Fort.  It will make it a little more comfortable to sit on once you get in.
Bring snacks into the Fort if you plan to stay awhile.

Bring a few books into your newly built Fort.  Read a few stories and maybe inspire a non reader to become a reader.  Score 5 for the Fort in a Bag!  Your tent is helping to promote literacy.      


Create a special name for your Fort with your child.  Your Fort in a Bag comes with a temporary name until you can decide on a family one.  

Consider a flashlight as an additional gift with your Fort in a Bag.  This is now a bonus gift included with your Fort in a Bag purchased in 2013!  

Stay and share a few extra minutes with your child. Cherish the memories you have just created in your uniquely designed Fort.  Score 6 for the Fort in a Bag!  Your child has a new piece of Heritage they will remember and share with their children in the years to come.


Finally, your Fort in a Bag is Eco-Friendly.  The bed sheets chosen are always repurposed and many times they are vintage pieces. Score 7 for the Fort in a Bag! Thank you for considering my product.  You made the world a little greener today.  

Best of Luck on your Fort building Venture!  It will get easier each time you create, I promise.

Danine

Tuesday, June 7, 2011

Artisan Award -not this year

A couple of months ago I entered the Artisan Award through Stampin' Up!  I now know that I was not one of the 10 winners chosen.

I am a winner.  I spent the hours and hours and hours preparing all the pieces.  The percentage of people that do that much is so small that I consider it a huge feat to have completed the 7 pieces required and mailed it.


The "competition" is only open to Stampin' Up! demonstrators and entries were to be submitted by April 22, 2011.  Being Canadian this meant I had to send out my entry the first week of April to insure that the American based company received it in time.  The obstacle I faced was that I crushed my hand in a rental door van 2 weeks prior to having to hit that first week of April deadline.  I pushed through and mailed the box!  Unable to hold scissors for 10 days and with stitches in 5 different places I still finished the project.  Yeah for me!


I had to include a special little message for all those that handled the box on it's way to the final destination.  Maybe a little corny but it was 3:30 am when I finally finished packing it up.


So....the next few blog posts will include what was all required to be submitted.  Stay tuned for a look at the 2 three dimensional projects, 3 scrapbook pages, and the 5 cards that were packed up.  I will not receive these pieces back.  The company will keep them and they should be on display at the Stampin' Up! convention I will be attending in July.  Only a month away!

Thanks for Visiting,

Danine

Thursday, May 19, 2011

Mother's Day Kid's Class

Here is a class I offered a few times over the past 3 weeks leading up to Mother's Day.  A project that was set for Mother's Day but could really be used for any occasion or non-occasion.


I prepared a portion of the project and then the kids did a little painting, sanding, and gluing.   


Here is the room nicely organized before one of the classes started.


Here you can see the blocks were prepainted.  The kids then painted the letters.


I had a special request for MUM.


Painting started cleanly!  It took a long time for this particular set to dry!


My boys all attended one of the sessions.  Mommy chose the papers they would be using.  Yes I am a little controlling.  


The blocks were sanded an the edges a little to give that distressed look.


Then the papers were "glued" to the blocks with Mod Podge.  Straight to the block and then coated across the top.


A hot glue gun attached the letters onto the blocked once they were dry and sanded like the blocks.


The ribbon was tied around the full block and into a bow.  There was then a little extra length tied in a knot around the original bow.  I added a little hot glue to secure the bow from coming undone.  

If you are interested I have a few extra sets left over!  Kits are $12.00 and will come with pre painted blocks.  

Thanks for visiting, 

Danine

Tuesday, May 3, 2011

Mother's Day Card with the Grade 1 Class


Tomorrow I am going to spend an hour with my oldest son’s Grade 1 Art Class.  I have designed a Mother’s Day Card that 22 of the kids will be making for their Mom’s. 
Each child will receive an envelope with their supplies.  In making this blog post I am actually cheating a little.  The kids are going to follow along the post as a tutorial on the smart board in their classroom.  Image the way things have changed.  Follow along for your step by step instructions as there are still a few days to create instead of buy.  


Fold your Red paper in half and press your finger along the fold.    


Glue the creme paper with the ribbon on it to the middle of the Red paper.  The torn edge should be facing up.  You can use a glue stick for this.


Go to the Stamp Station and choose a stamp for the inside of your card. 


 Stamp the back of your card too.  


Take your pink paper to the Big Shot Station to emboss and cut out the Top Note shape.  Mrs. Regenwetter will help you do this step.  


Glue the pink paper to the front of your card over top of the ribbon.


Use pencil crayons to color your Mom Stamp and cut out along the edges.  


Your teacher will give you 2 pieces of puffy tape to stick it to your card.


Bend the 5 butterflies and then glue one of their wings to your card.  Make your own design with the butterflies.  


Go to Mrs. Regenwetter to get your rhinestone added.  


Put your card on the counter to dry.  Remember to put the envelope with your card too.  
You are all finished.  
Clean up your desk and help clean up the Big Shot Station or the Stamp Station.
I am really looking forward to working in the classroom and I know I am going to be receiving a beautiful Mother’s Day Card in exchange!  I already have a smile thinking of how many happy moms there will be on Sunday when they open this card handmade by their child.  
Thanks for joining me,
Danine